


Knowing what indicators to use and what the best combination of technical indicators is can dramatically improve chart reading skills. If you use the wrong technical indicators, this can lead to inaccurate price interpretation and subsequently to poor trading decisions.
Our team at Trading Strategy Trader has carefully selected each technical indicator in order to give us the best performance for each individual trading strategy we create. Also, read our best ADX strategies.
However, if you are the price action type of trader who only uses naked charts you can safely check out our step-by-step ultimate chart guide.
Technical indicators make it easy for you to identify current price trends and predict future price movements. By developing an effective technical analysis strategy, you can increase the amount you earn each trading day.
However, while all technical indicators are useful, each has its own weaknesses. If you only use a single indicator to monitor the market, there may be certain price trends (or dangers) that you don’t notice.
By combining several technical indicators into a single trading strategy, you can limit your risk while still earning strong returns. Below, we will explain how to create a multi-indicator strategy.
A multi-indicator strategy should avoid being redundant and should use a combination of the best trading indicators in a meaningful way. We also have training on the Universal Range Indicator.
A multi-indicator strategy has the danger of being redundant because many traders use indicators that show the same type of information. To avoid being affected by this trade fall, you need to understand that technical indicators can be classified into three groups, as follows:
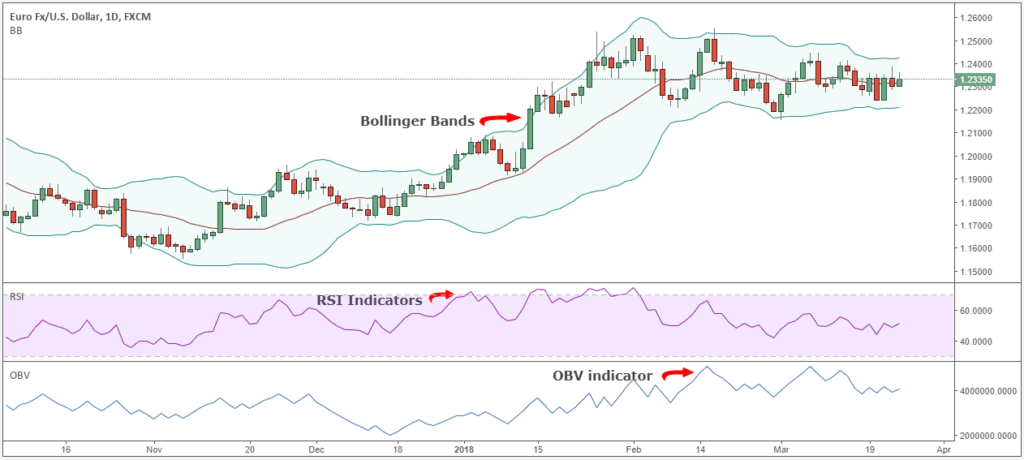
- Trend Following Indicator allows you to determine whether an asset is currently overbought or oversold. Many trend following indicators, such as Bollinger Bands, attempt to create a clear “channel”. A clear channel will tell you whether the price is about to break out or return to normal.
- Momentum indicators , such as the Relative Strength Index (RSI), allow you to determine the direction and strength of the current price trend. As the asset begins to build momentum, opening a new position will become less risky. Looking at the Moving Average indicator also helps you measure momentum.
- The volume indicator helps traders identify a strong (strong) relationship between price and volume. An increase in trading volume almost always leads to an increase in price. However, these events do not always occur at the same time, therefore the volume indicator is good for advanced forecasting. The On Balance Volume (OBV) and Money Flow are two of the most useful volume indicators.

As you can see, while these category indicators try to determine the same thing—whether the price will increase, decrease, or remain stable—the angle each one offers is unique. Looking at the market from many different angles can help you develop a more accurate, realistic, and actionable perspective.
Basically, if you trade with a multi-indicator strategy that uses the RSI indicator, the MACD indicator and the stochastic indicator, you are basically using 3 types of technical indicators that belong to the same category.
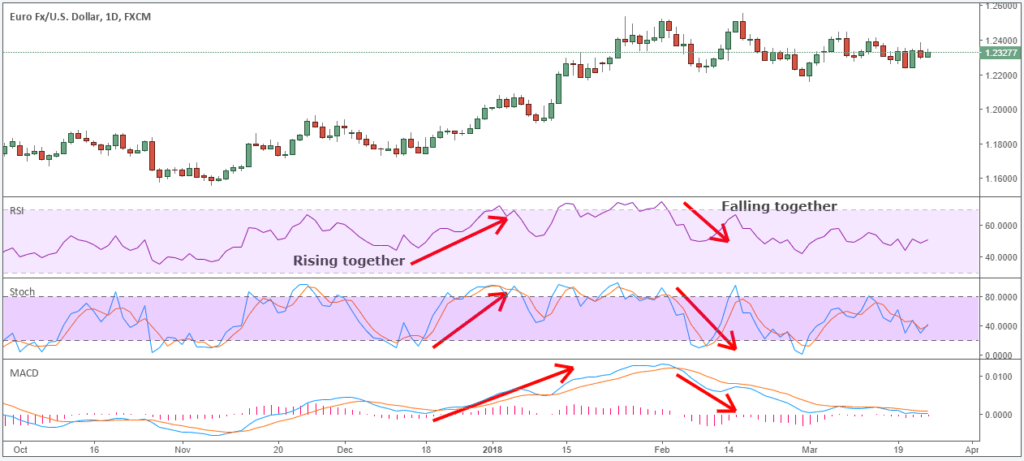
These are all momentum indicators that will display for you the same type of information in one way or another. In the figure above, you can see how all indicators follow each other simultaneously.
This is not good!
The problem with using inaccurate technical indicators is that you may actually think the trading signal is stronger if all the indicators point in the same direction.
Setting to information that is too impressive than using indicators that belong to the same group is quite easy. Avoid using technical indicators that display the same information. The best strategy of several indicators combines indicators that show different types of information.
Best Multi-Strategy Indicator
Now comes the fun part.
Moving forward, we will highlight what indicators to use for the best strategy indicators.
We will use momentum indicators, trend-following indicators and volume indicators which support and complement each other.
RSI Momentum Indicator
We will not take the time to explain how RSI is argued because we live in the age of computers and they do the work automatically for us.
The Relative Strength Index is a momentum indicator and a leading indicator at the same time. Many traders like the RSI indicator because it is easy to use.
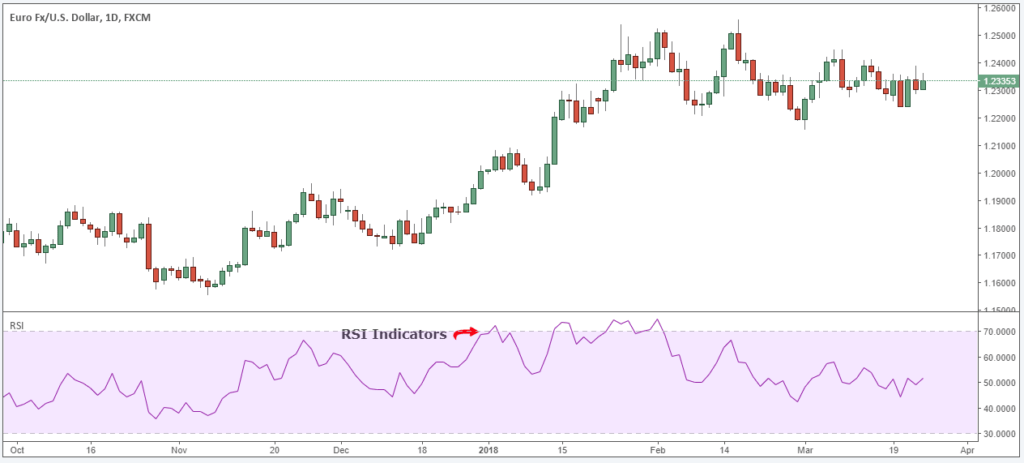
We use the RSI indicator to identify possible overbought and oversold conditions in the market.
Next, we will mention our second indicator.
OBV – Volume Indicator
The second indicator used for our strategy is the OBV indicator.
The OBV indicator is based on the idea that both volume and price activity are equally important. In this regard, OBV combines both price and volume to show the amount of funds entering and exiting the market.
The screenshot above shows how your chart setup should look if you follow the instructions above.
The main idea behind the Volume On Balance indicator is that the market price will follow where the volume current is going.
Now, all we have to do is name the last technical indicator that will complete the multi-indicator strategy.
Ichimoku Kinko Hyo (Ichimoku Cloud)
The Ichimoku cloud is another trend indicator popular _ Ichimoku Kinko Hyo will plot several different lines on the chart that make it easy to identify strong future support or resistance.
On the indicator chart, there is a blue line (Kijun Sen), a red line (Tenkan Sen), a green line (Chikou Span), and a red/green group involved (Senou Span). To get an accurate movement reading, each of these lines needs to be considered.

The blue line (baseline) will plot the average of the highest high and the lowest low over the past 26 trading periods. Similarly, the red line (rotating line) will plot the average of the highest high and the lowest low over the past nine trading periods.
The trailing green line will plot the closing price 26 periods in the past. This will help give you a better perspective on monitoring trends.
- The first band will be calculated by averaging the blue and red lines together.
- The second band will be calculated by averaging the highest and lowest over the past 52 trading periods.
The last step is to take the trend line and move it 26 periods ahead. Once all these lines are plotted together, you will have a broad view of the market. From here you will be able to decide if there is a strong enough trend to justify opening a new position.
Bollinger Bands – Trend Following Indicator
Bollinger Bands are the best trend following indicators that measure market volatility. It is also our third best strategy indicator.
Buying and selling based on Bollinger bands can be a very effective trading strategy especially when used in conjunction with other technical indicators.
Finally, your chart setup matches the chart above.
Without further ado, let’s see how you can trade efficiently using some technical indicators and how to make consistent profits in a smart way.
Multiple Indicator Strategy
For our strategy, you need to use three to four technical indicators to successfully trade. These indicators include Relative Strength Index, Ichimoku Cloud, Bollinger Band, and On Balance Volume. Overall, these indicators contribute to the trend, momentum, and trading volume that all traders need to pay attention to.
Now, before we go any further, we always recommend taking a piece of paper and a pen and note the rules of the trading strategy. For this article, we will look at the buying part.
Note * This strategy can be used on any time frame so go ahead and apply it on the time frame of your choice.
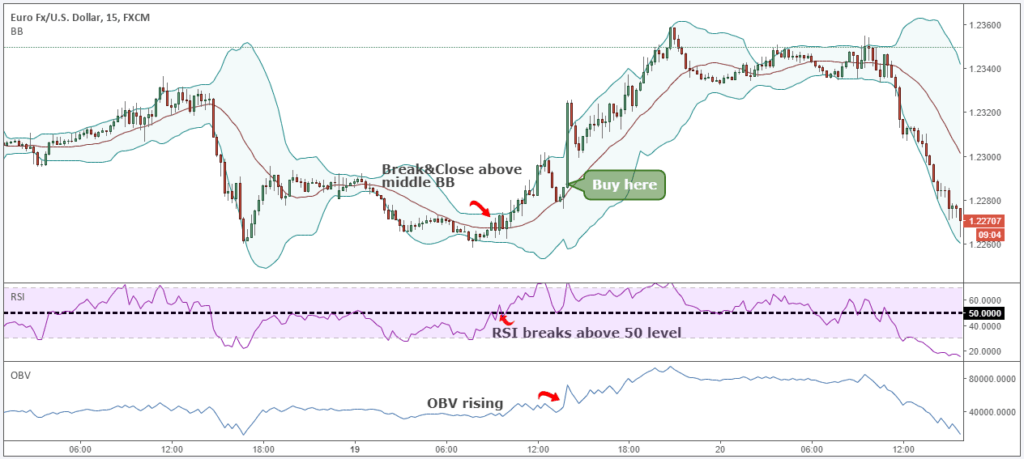
Step #1: Price should Break and Close above the middle Bollinger Band
The first step is easy!
In fact, the overall strategy is so easy to understand that you will be able to trade immediately.
Therefore, the first trade confirmation we need is the price to break and close above the middle Bollinger band. If this trading condition is confirmed, we can check other indicators to add more leverage to our trading signals.
Now, let’s see what the RSI indicator says about the price action.
Step #2: Wait for the RSI indicator to trade above the 50 level if it hasn’t already
Everything we do at Trading Strategy Guide is logical! We always try to understand how to interpret the action of any given technical indicator.
Throughout this step, we try to find an agreement between what the Bollinger Bends are saying and the RSI’s own price reading. Therefore, a breakout can be confirmed if momentum is behind the move.
Usually, an RSI reading above the 50 level is considered positive momentum while an RSI reading below the 50 level is considered negative momentum.
Note * Not all the time you will see the RSI break above the 50 level at the same time as the price split above the middle BB. Sometimes, we have to wait longer for bullish momentum to emerge.
Step #3: Wait for the OBV indicator to rise. Buy in the market as soon as you see the amount confirming the price.
The last trade condition before pulling the trigger is again easy to understand. We want to trade on the side with smart money. In this case, we look for evidence that the trade we want to take as real buying power behind it.
We can see that the real amount only appears later. It is important to be patient and wait for the right trading conditions to meet before entering into a long trade.
The next important thing we need to do for our scalping strategy is where to place our protective stop loss.
See below…
Step #4: Hide your Protective Stop below the lower Bollinger Band
Knowing where to place your protective stop loss is just as important as knowing when to enter the market.
A logical place to hide your protective stop is below the lower Bollinger band. A break below the low BB will invalidate our trade idea, and we want to minimize our losses.
Finally, we also need to determine the profit level for the multiple indicator strategy which brings us to the last step.
See below…
Step #5: Take Profit when the price breaks below the lower BB
Our take profit strategy only sees one indicator to signal us a possible exit zone. If we wait for confirmation from various indicators then we will also be able to return some of our profits.
In this case, the best way to take profit is when we see the price reverse. A break below the lower Bollinger Band is a good signal for a possible reversal, so we want to take our profits.
Note ** above is an example of a BUY trade using some technical indicators. Use the same rules for SELL trades – but in reverse. In the picture below, you can see an example of a real SELL trade.
The conclusion
You need to take the necessary time and learn the meaning of each technical indicator. No indicator will give you a 100% win rate so don’t be the one chasing the fairy tail. In the $6 trillion Forex market, no one can predict the market with certainty. Here’s how to apply technical analysis step by step.
However, if you follow our best combination of technical indicators you can increase your chances of winning more often than losing market trades. You should remember that all indicators are based on past prices so only a multi indicator strategy can help you predict the future.
Thank you for reading!
Please leave a comment below if you have any questions about the Best Combinations of Technical Indicators!